Human Activity Detection with TensorFlow and Python
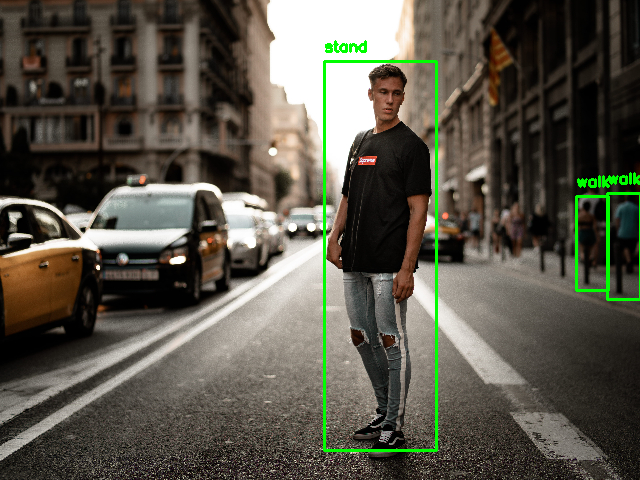
Image Source: Wallpaper Flare
We, as humanity, have had access to cameras for a long time now. Traditionally cameras can capture and record the scene in front of them (as an image / video) but they don’t actually understand what’s going on in the scene.
In recent times, with the rise of AI, particularly computer vision algorithms, cameras are starting to understand what’s happening in the image/video they have recorded.
If we compare it with our human vision system, cameras are like our eyes and the computer vision algorithms are like our brain which is processing the visual information to understand what’s happening in the scene.
At the core, it is important for the algorithms to understand what activities are performed by the humans in the scene. For example, if a CCTV camera can detect a harmful activity like “people fighting” and alert the corresponding personnel, it would really useful right ?
In this blog post, we are going to look at a simple baseline model that can detect basic human activities like walking, running, sitting etc from image and video. We will be using OpenCV, TensorFlow and Python for the implementation. Without further ado, let’s get started.
Getting Started
We will be using a Faster-RCNN object detection model with ResNet101 backbone pre-trained on Google AVA Actions dataset which contains the bounding box annotations for 60 basic human actions like sit, stand, walk, run etc. The entire list and the code for this blog post can be downloaded using the form below.
You can install the dependencies using the requirements.txt file given in the code base for this post.
        cd human-activity-detection/
        wget https://github.com/visiongeeklabs/human-activity-detection/releases/download/v0.1.0/frozen_inference_graph.pb
        pip install -r requirements.txt
It will install the packages we will be using in the code and the corresponding dependencies for those packages. We also need to download the model weights file that we will be loading and using in the inference scripts.
Activity Detection on Image
Let’s walk through the code in the detect_activity_image.py script.
In the above lines, we are importing the necessary packages we will be using in the script. The model has been trained using TensorFlow 1 older version. To use it in the latest version of TensorFlow, we are using the compatibility module in TensorFlow 2.x and disabling the v2 behaviour for the purpose of our current code.
Above line checks whether GPU is available for use in the system. It will print True if GPU is found and will be used by TensorFlow.
In the above block, we are specifying the path to the model file and input image. We need to pass the input image path from the command line while running the code.
Next, we are reading the input image from the specified path using OpenCV and getting the shape of the image. We are adding an extra dimension to the array to pass the image to the model as a batch. Here, we are passing a single image but it is possible to batch a number of images to together and run inference on them.
In this block, we are reading the class names from the text files and adding them to the labels list.
In the above block, we are loading the model graph from the file and parsing it and noting down the time it takes to load the graph.
In this block, we are preparing the input and output tensors to pass in and get back from the model. image_exp will be passed as the input tensor and 'num_detections', 'detection_boxes', 'detection_scores', 'detection_classes' are the output tensors we will be reading from the model output. We are also clocking the time it takes to run inference on the image.
In these lines, we are reading the values in the output dictionary and casting it to appropriate types.
In this block, we are looping through the detections and drawing the bounding box and the activity name on top of the bounding box. We are processing the detections only above a particular confidence threshold. Here, we are using a default threshold value “0.5” but it can be varied.
Bounding box co-ordinates coming out from the model are normalized values and range from 0 to 1. We need to multiply it with the actual width and height of the input image for drawing rectangle using the rectangle function in OpenCV.
In this last block, we are displaying the output image with bounding box drawing and class names and saving it to disk.
Now, we can run the script from the command line with an input image and check the output.
        python detect_activity_image.py /path/to/input/image
        # For example
        python detect_activity_image.py sample_inputs/input_image1.webp

Image Source: Business Insider
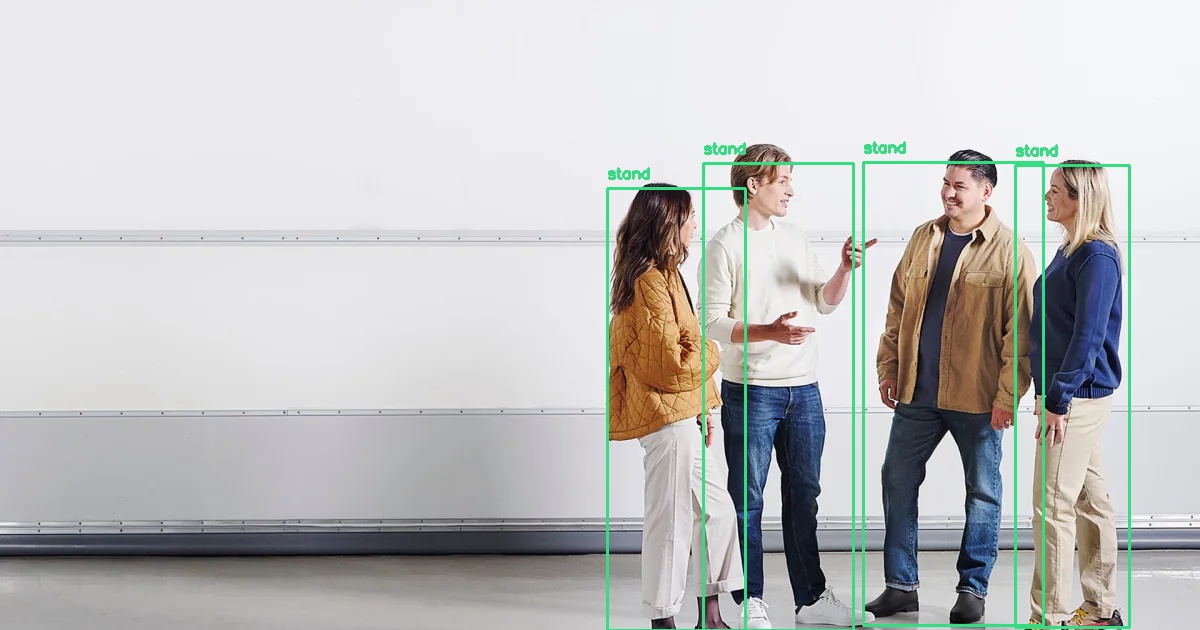
Image Source: Saab
Activity Detection on Video
Now that we are able to detect activities on images, let’s try to do the same on videos. The approach is the same. As you might know, video is just a moving collection frames where each frame is an image by itself.
We will read the frames from the video one by one, pass it through the model, draw the detections on the output frame and write it to the output video.
In the above block, we are opening the video file using the path passed from the command line and getting the width, height, fps (frames per second) and total number of frames present in the video using OpenCV and printing them for reference.
In this block, we are initializing the video writer to save the output video. We are passing a name, format and other details we read from the input video. We are also initializing the frame count to keep track of the number of frames that have been processed so far and generating color values for each class in the labels file to use it while drawing bounding boxes.
In this block, we are reading the frames from the video and looping through them one by one.
As you can see, the rest of the workflow is same as the workflow we followed for detecting activities on an image. Instead of using imwrite method, here we are using write method from the video writer.
At the end of the program, it is recommended to release the resources we have been using.
Now, we can run the script from the command line with an input video and check the output.
        python detect_activity_video.py /path/to/input/video
        # For example
        python detect_activity_video.py sample_input/sample_video1.mp4
As you can see from the output video above, the model gets confused between walk and stand. Since it is looking at each frame separately, it is having a hard time to understand whether the person is standing or walking. We can reduce the flickering by applying methods like moving average on top of the predictions and stabilize the output.
There are more complex models which process a bunch of frames together instead of single frame to better understand the context and produce more accurate predictions. I will be covering them in future posts.
Limitations
There are some known limitations to this model that we need to keep in mind while using it.
- It is an object detection model working on a single frame at a time. It doesn’t really have the memory of previous frames. For complex actions, it is important for the model to know what was happening in previous frames.
- Faster-RCNN with ResNet101 backbone is a heavy model. It is recommended to run on a reasonably powerful GPU for faster processing. For example, on average it takes around 110 ms for a single frame of size 1280x720 on Nvidia T4 GPU (15 GB RAM) and takes around 3.5 seconds for the same frame on Intel Core i5 CPU (1.8 GHz, 8 GB RAM).
- Sometimes the same person might be doing multiple activities like watching a person while standing. The model produces separate bounding boxes for each activity for the same person which might make the output image clumsy (that is why we have omitted few classes from processing).
Conclusion
In this post, we looked at a simple baseline object detection model for detecting human activities from images and videos. Human action recognition is still an active area of research. We have barely scratched the surface, to be honest.
There is a lot to cover. Feel free to join the mailing list to get notified when new posts are published. If you are working in the area of human action recognition, what models are you working with ? What issues are you facing ? Let me know your thoughts in the comments. Cheers.
Support on Patreon
If you are getting value out of my work, please consider supporting me on Patreon and unlock exclusive perks such as
- Downloadable PDFs
- Ready to run Google Colab notebooks (with all the dependencies pre-configured)
- Early access to blog posts and video tutorials
- Hands-on live coding sessions and Q&A
- Access to exclusive Discord Server